Manipulators
When an object is physicalized, its position and rotation are computed by the physics engine. You can't directly control the Unity transform with a script, or in the editor. If you want to control and drive this object position, you can use a manipulator.
Note
A manipulator sets up a target that the rigidbody tries to reach. If a collision or a joint limit prevents this rigidbody to reach the exact target, it tries to go as close as possible while respecting the physical limitations.
Manipulators are available in two flavors:
- Position based manipulators, that tries to match a target position.
- Velocity based manipulators, that tries to match a target velocity.
Position based manipulator
If you want to control the Transform of your object with a device (trackers, controllers..) or a unityTransform with a script you should use this component. Position based manipulator can be used to compute inverse kinematics by manipulating the end effector of an articulated mechanism.
To add this manipulator:
- Select your object, then INTERACT > Physics > Add manipulator. The Position based manipulator component will then be added to an empty object.
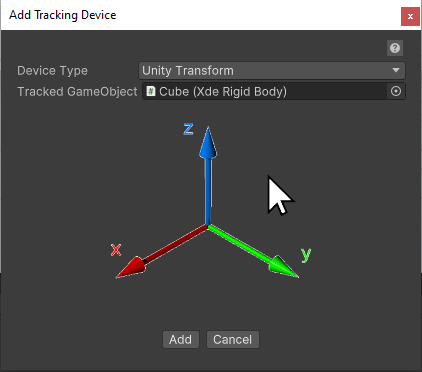
- Then you can configure the manipulator in the following pop-up:
- The XdeRigidbody attached to the device.
- The device providing the input target, explained below.

-
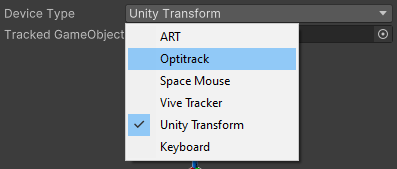
When selecting your device, you have:
-
Unity Transform that uses the current gameObject position as a target.
Controlling a rigidbody by script
You can control a Unity Transform by script or using an Unity animation.
-
Vive Tracker, ART Body and Optitrack Body that are physical trackers that will provides a 6DOF tracking (3 translations + 3 rotations) in your virtual world. You can directly use this position to drive the position of a rigidbody.
For these trackers, you need to indicates the tracker ID in the respective component.Tip
For ART and OptiTrack tracking, the proper software (resp. Dtrack or Motive) needs to run in the background to stream the body position.
-
Space Mouse
- Keyboard

-
Manipulate several bodies with one device and several manipulators
Several manipulators can be attached to a single XdeDevice. With this setup, both manipulators will receive the same output from the device. Hence, if both manipulators have the same configuration, the motion of their attached RigidBodies will be identical.
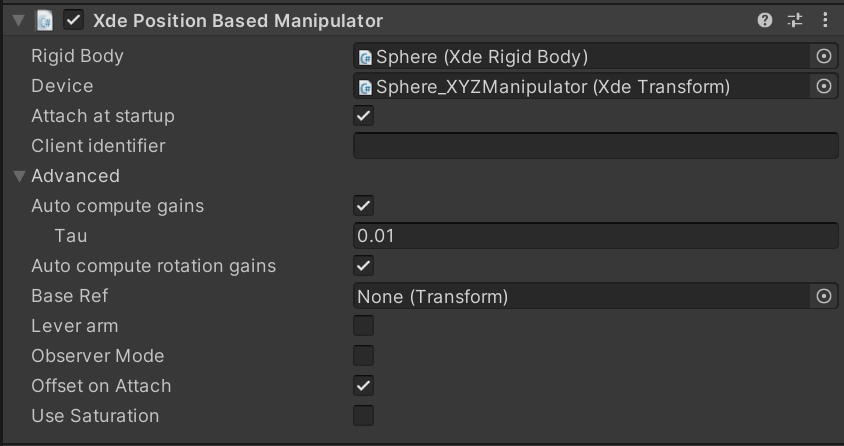
Xde Position Based Manipulator component

- RigidBody field corresponds to the object you want to manipulate.
- Device field corresponds to the device you want to take position data.
-
Attached at startup If this field is checked, the XdePositionBasedManipulator automatically attach the target when the simulation starts. Otherwise, you will need to call the
Attach()/Detach()methods of the XdePositionBasedManipulator by script. -
Check Auto compute gains to automatically compute the gains of the manipulator based on the target's mass. If checked, you need to define a response time Tau (in seconds): the lower it is, the more responsive the manipulation is. If unchecked, you need to define translation stiffness (Kt) and translation damping (Bt) gains manually.
-
Check Auto compute rotation gains to compute rotation gains based on translation gains and the target's inertia. If unchecked, you need to define a response time Tau or rotation stiffness (Kr) and rotation damping (Br) gains manually.
-
Base Ref is the referential of the position data: all position data coming from the device will be placed in this referential. This is typically the referential of your tracking system, for example the ART origin.
-
Lever arm: define the manipulation mode.
If it is checked: the rigid body will be attached as if it were located at the end of a lever arm. If it is unchecked (wiper mode): the position of the rigid body will not be impacted by the orientation of the device, while the orientation will be mapped from the device to the rigid body.
-
Offset on Attach
If it is checked, the current offset (when calling Attach) between the device position data and the rigid body to manipulate will be taken. If it is unchecked, you may define a manual offset.
-
Use Saturation is the maximum allowed movement (translation, rotation) per time step. The lower it is, the slower the object will move.
Tip
If you don't want any control in rotation, specify a big value in rotational response time, or 0 for rotational stiffness and damping.
Velocity based manipulator
You can also retrieve a speed target to drive a rigidbody. You can add a SpaceMouse manipulator to directly control a rigidbody using a 6D mouse. This manipulator is especially useful to check assembly feasibility in complex mockup, since you can drive the rigidbody accurately while having complex collisions.
Xde Velocity Based Manipulator component

-
Attached at startup
If this field is checked, the XdeVelocityBasedManipulator will automatically attach the target when the simulation starts. Otherwise, you will need to call the
Attach()/Detach()methods of the XdeVelocityBasedManipulator by script. It can also be useful to manually callAttach()orDetach()methods while using scenarization events to manipulate the next Rigidbody in your assembly sequence. -
Observer mode
If
Observer modeis enabled andCameraReffield is set, your object will move in view space instead of object space. This is the recommended setting. Indeed, if you move your SpaceMouse to the right, you generally expect that your part move in the same direction. If you are moving in local space, your movements will be reversed when you are looking from the back of your object.
Velocity limiter
Consider enabling the Velocity limiter parameter while using a Spacemouse. This will ensure that your velocity will never exceed the collision search area on a given timestep.
Manipulator with Vive Ultimate Trackers
In case you would like to attach a physicalized object to a tracker, here is the steps to follow.
- First, add an manipulator by right clicking in your object INTERACT > Physics > Add manipulator.
- Select the device Vive Tracker.
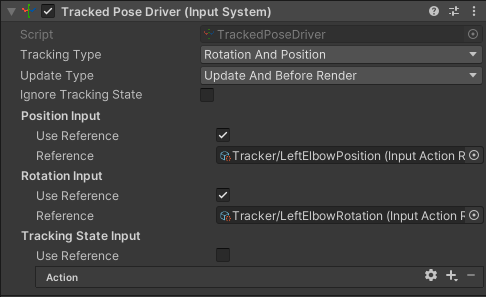
You should notice that a new object had been added in the hierarchy, that is your manipulator. - In this object's inspector, find the component Tracked Pose Driver (Input System):
- Check the Use Reference in both Position Input and Rotation Input.
- Select the "Tracker/.." with the tracker you want your manipulator to be attached to, in both position and rotation references.
For example if you wan to attach your object to the left elbow tracker
- Select Tracker/LeftElbowPosition for the reference of the Position
-
Select Tracker/LeftElbowRotation for the reference of the Rotation
