Importing CAD models
We strongly recommend to use Pixyz plugin in order to import your CAD model in Unity. You can contact Unity to purchase a license.
We support the 2.0 version of Pixyz plugin from INTERACT 23.11. You can now install it from the Unity Package Manager: com.unity.pixyz.plugin4unity. Reopening your Unity Editor might be necessary to clear some issues.
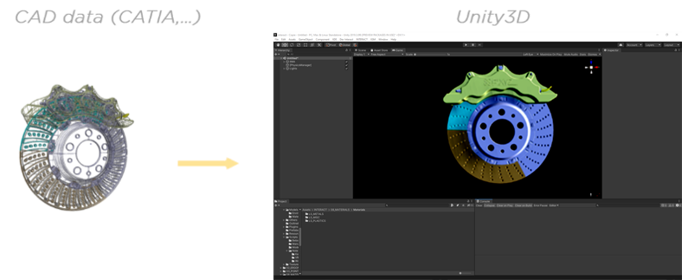
Supported CAD files formats are :
- Solidworks (.sldprt, .sldasm)
- Catia V5, V6 (.CATPart, .CATProduct, .3dxml)
- Siemens JT (.jt)
- AutoCAD 3D (.dwg)
- Autodesk Revit (.rvt)
- Autodesk Navisworks (.nwc, .nwd)
- Autodesk Inventor (.ipt, .iam)
- Rhino3D (. 3dmbak)
- SketchUp (.skp)
- IGES (.igs)
- STEP (.stp)
- STL (.stl)
- OBJ (.obj)
- FBX (.fbx)
And much more ! See the full list of supported formats on Pixyz documentation.
Import your 3D CAD models into Unity 3D
To import your 3D CAD models into Unity3D:
- Click on Interact>Import>CAD model
- In the explorer, select your CAD file and click on Import The PiXYZ CAD Import Settings window appears. From there, you can adjust the default import settings if needed.
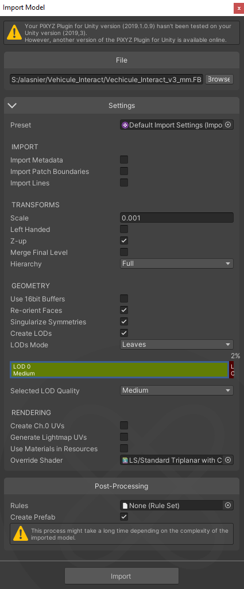
Import Parameters
The settings used to import a 3D model will impact the performance of your simulation. There is no set of preferences that will work every time, as every use-case is different, with varying input data.
The default settings proposed are representative of a simple CAD model import scenario. They are to be used as guidelines for beginners but are meant to be adjusted to user’s requirements.
Import

- Import Metadata: Import metadata contained in the original model (if any), which is a piece of information that can be carried by any node of a CAD model’s hierarchy, that can carry information such as part numbers, ownership, physical properties, part type.
- Import Patch Boundaries: Import patch boundaries as lines. Only works if model is a CAD model (has BReps).
- Import Lines: Import lines such as laser marking. Only works if model has lines.
Transforms
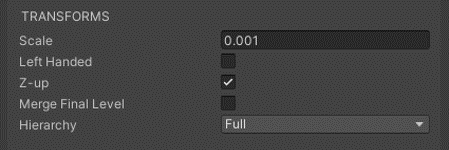
Use the Transforms settings to adapt the imported model’s units/transformation to Unity3D units/coordinate system (meter as its default unit, left-handed coordinate system with Y as the Up axis).
- Scale: sets the scale of the imported model.
- Left handed: use this setting to mirror a model from a right-handed coordinate system to a left-handed one.
- Z-up: use this setting to rotate the model from Z-up to Y-up.
- Merge Final Level: use this setting to assemble together unconnected CAD surfaces prior to any data treatment at import (it is a pre-process).
Sometimes, surfaces contained in a file inherited from CAD software are delivered as multiple sub-surfaces disconnected from one another, where they should be unified as a single surface.
If they are not connected together prior to mesh creation by PiXYZ, the resulting mesh will be delivered as multiple sub-meshes, and might show gaps where there is supposed to be continuity.
- Hierarchy: Choose one of the proposed mode to optimize the imported model’s hierarchy or (product structure)
- None: no modification of the hierarchy.
- Clean-up intermediary nodes: Compresses the hierarchy by removing empty nodes or any node containing only on sub-node.
- Clean-up all objects under root: Simplifies the hierarchy by transferring all imported 3D objects under the root node of the imported model.
- Merge all objects: All objects contained in the original model will be merged together, as one single object.
- Merge all objects by material: All objects contained in the original model that share the same material will be merged together.
Geometry
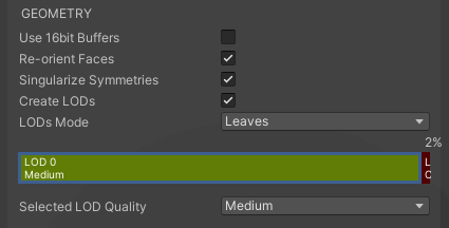
- Use 16Bit buffers: Use this setting if you wish to create meshes limited to 65k vertices. Meshes will be created with a 16 bit index buffer (32 bit by default). Consider using this setting if you wish to publish the model on a platform with limited power.
- Re-orient Faces: Use this setting for PiXYZ to perform a unification of all triangles/faces orientation.
- Caution: Do not use this setting if the imported model is a mesh (tessellated geometry) and is already correctly oriented.
- Caution: Do not use this setting if the imported model is a mesh (tessellated geometry) and is already correctly oriented.
- Singularize Symmetries: Some file format may use symmetries to avoid duplicating meshes. If the setting is set to false, symmetries with be handled with a single mesh and matrices with negative scales, which can be problematic in some cases, such as for lightmapping with Unity. By checking this setting, such matrices will be kept with positive scales and symmetries will be split in two mirrored meshes.
- Create LODs: If checked, LODs will be generated during the import process. LODs are generated by decimating meshes if the input model is already meshed, or by using different tessellation parameters if the input model is represented with BREPs. For more details, please check LODs Generation and Mesh Quality.
- Once the "Create LODs" checkbox is enabled, the Group box is renamed "LODs Mode". From that point, the user can add multiple LODs and define a Mesh Quality preset for each added LOD. (Right-click for adding new LOD)
- Mesh Quality: This settings drives the quality of the imported model (when not creating LODs), by either decimating or tessellating with various quality presets. Please check Mesh Quality for more information.
- LODs Mode :
- Root Mode: The LOD Group is placed on the root node of the imported model. Use this setting if you wish to control the global visibility of the entire imported model at once.
- Leaves Mode (default mode): The LOD Group is placed on the parent-node of each mesh (or object) existing in the hierarchy. Use this setting if you wish to control the visibility of each sub-part of the imported model.
Rendering

- Create CH. 0UVs: Use this setting to add a new primary UV set (channel #0). Set the size of the projection box used to create UVs.
- Caution: PiXYZ will override the existing UV set, do not use this setting if you wish to preserve the UVs embedded in the imported model (tessellated model).
- Caution: PiXYZ will override the existing UV set, do not use this setting if you wish to preserve the UVs embedded in the imported model (tessellated model).
- Generate Lightmaps UVs: Use this setting to create automatically optimized UVs on channel uv1 for your lightmaps.
- Use Materials in Resources: By default, the plugin imports the CAD models and creates a new Unity Material for each material in the file. Use this setting to automatically detect (name based) and use existing Materials in any "Resources" folder of the project.
- Override Shader:
- If left unset, the plugin will pick the current Render Pipeline default shader to build the Materials from the imported Model. If no Scriptable Render Pipeline is used, that means that the Standard shader will be used. On the other hand, if HDRP is used for instance, it will use the HDRP default shader.
- If set, then the plugin will always use the given shader to build the Materials from the imported Model.
Shader
In order to view the cross-section, materials need to use our custom shader LS Standard Triplanar with Cut.
LOD - Level of Details

When an object in the scene is a far away from the camera, the amount of details that can be seen on it is greatly reduced. However, the same number of triangles will be used to render the object, even though the detail will not be noticed. An optimization technique called Level Of Detail (LOD) rendering allows you to reduce the number of triangles rendered for an object as its distance from camera increases.

LOD will reduce the load on the hardware and improve rendering performance.
In the import window, you can configure each LOD independently.

Check the Create LODs function to enable LODs.
- Select the mesh quality preset for each LOD and adjust the visibility percentage. The percentage value represents the maximum visible proportion of a part/model when the camera is moving forward/backward before switching to the following LOD available, until disappearing (culling percentage).
- After setting the parameters, click on 'Import'.
- The CAD model will be tessellated or decimated and imported as a prefab in the folder '3DModels'.
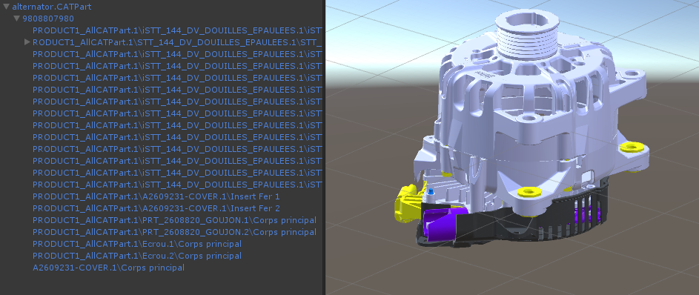
An instance of the prefab has also been imported in the hierarchy. You can modify the position/orientation of the object in the scene by dragging the arrows of the model or modifying the 'Transform' property in the 'Inspector' tab.
Removing Plugin
To remove the Pixyz plugin from your Unity project you first have to delete the Pixyz and Plugins folders. Then you must also remove the Scripting Define Symbols linked to the Pixyz Plugin in Edit > Project Settings... > Player > Scripting Define Symbols
